What is a Shelly?
The Shelly 1 is a versatile, compact relay module specifically designed for smart home applications. It allows you to control electrical devices like lights, heaters, or fans by turning them on and off via Wi-Fi. The Shelly 1 is installed directly into the power line and can be managed through the Shelly app or other smart home systems.
A major advantage of the Shelly 1 is its open API interface, which enables developers to integrate it flexibly into custom systems or projects—whether through MQTT, HTTP, or CoAP. This makes the Shelly 1 ideal not only for end-users but also for DIY enthusiasts and developers looking to implement their own automation ideas.
Technical Highlights:
- Wi-Fi Control: Operable directly over Wi-Fi without needing an additional hub.
- Compact Size: Fits into standard in-wall electrical boxes behind light switches.
- Flexibility: Supports various control protocols and can also be operated locally.
- Compatibility: Works with smart home platforms like Alexa, Google Home, Home Assistant, and many more.
The Shelly 1 is known for its user-friendliness and excellent value for money, making it a popular choice for smart home automation. For more information, you can visit the manufacturer’s website.
I still have a few Shelly 1 modules lying around, and I wanted to show you how to easily connect to a Shelly using an ESP and trigger switching operations with the HTTP POST protocol.
Required parts and configuration of the Shelly
Shelly 1
ESP32
Arduino IDE or VS Studio Code
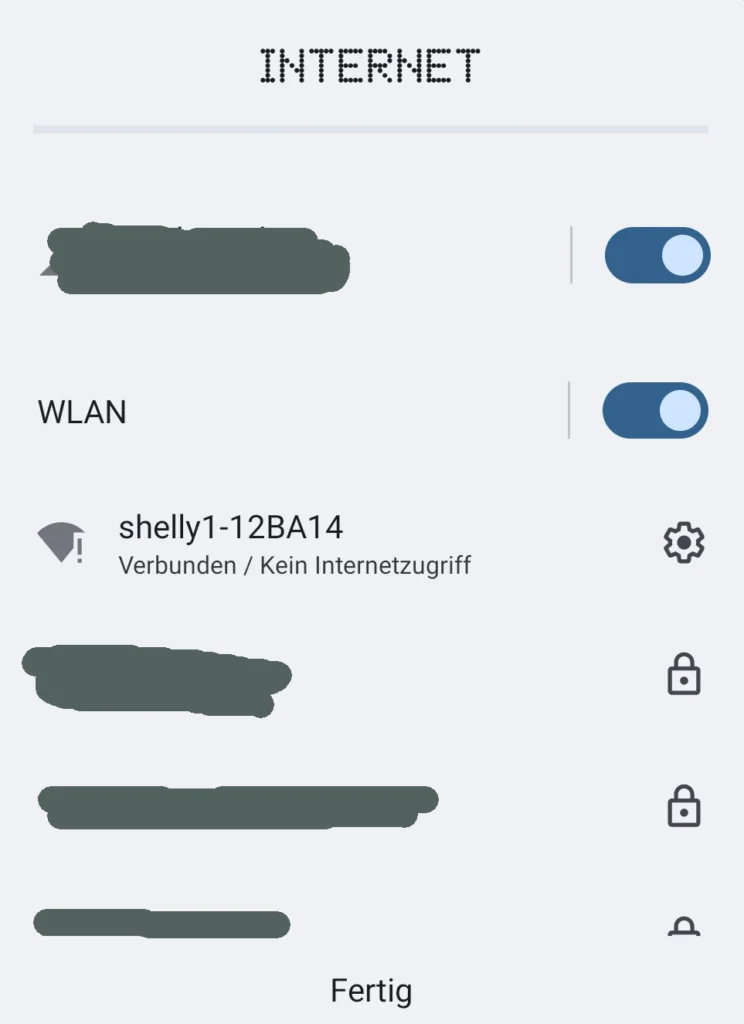
First, the Shelly needs to be set up. It’s important for it to operate as a wireless access point so the ESP32 can connect to it as a client. Begin by connecting the Shelly to a power source (please note, this should be done by a professional!). Once the Shelly is powered up, take your smartphone and check for available Wi-Fi networks. You should see one named something like “Shelly-something.”
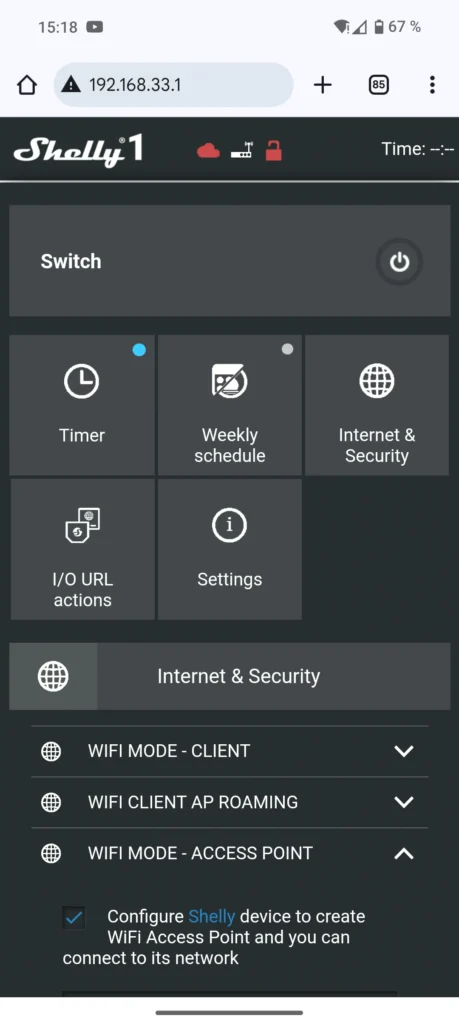
Connect your smartphone to this wireless access point, and enter the IP address 192.168.33.1 in your browser. This will take you to the Shelly’s interface, where you can go to Internet & Security -> WiFi Mode – ACCESS Point to set up the SSID and password. We’ll need this information shortly in our code.


How does the ESP switch a Shelly?
To trigger a switching operation, we send the following command from the ESP32 to the Shelly over Wi-Fi and receive a response back from the Shelly.
http://192.168.33.1/relay/0?turn=on;
Answer: {"ison":true,"has_timer":true,"timer_started":0,"timer_duration":3600,"timer_remaining":3600,"source":"http"}

http://192.168.33.1/relay/0?turn=off;
Answer: {"ison":false,"has_timer":false,"timer_started":0,"timer_duration":0,"timer_remaining":0,"source":"http"}
What we’re particularly interested in is the true or false after ison. This gives us feedback on whether the device was switched on or off.
The code for switching
// Integration of required libraries
#include <Arduino.h>
#include <WiFi.h>
#include <HTTPClient.h>

//some constants here WIFI name and password as an example
const char ssid[] = "shelly1-12BA14";
const char password[] = "shellyAP";
const char schalter_on[] = "http://192.168.33.1/relay/0?turn=on";
const char schalter_off[] = "http://192.168.33.1/relay/0?turn=off";

// Funktionsdeklarationen hier einfügen:
void begin_wlan_client(); // How to set up a WIFI connection
String http_Post_Request(const char* url); // String for post request to Shelly
void heizung_ein(); // Switching process on
void heizung_aus(); // Switching process off

// Setup - only log in to the Shelly here
void setup() {
  begin_wlan_client(); // Starting the WLAN connection
}

// Loop
void loop() {
  // Example of switching the heating on and off
  heizung_ein();
  delay(10000); // Wait 10 seconds
  heizung_aus();
  delay(10000); // Wait 10 seconds
}

// Insert function definitions here:
void begin_wlan_client() {
  WiFi.begin(ssid, password);
  Serial.begin(115200); // For debugging in the console

  Serial.println("Establishing a connection to the WiFi...");

  // Waits until the ESP32 is connected to the Shelly WiFi
  while (WiFi.status() != WL_CONNECTED) {
    delay(500);
    Serial.print(".");
  }
  Serial.println("");
  Serial.print("Connected with IP: ");
  Serial.println(WiFi.localIP());
}

String http_Post_Request(const char* url) {
  HTTPClient http;
  http.begin(url); // Start the HTTP connection

  int httpResponseCode = http.GET(); // Send HTTP GET request

  String payload = ""; // Empty payload for the response
  if (httpResponseCode > 0) {
    payload = http.getString(); // Receive response as string
    Serial.print("Answer: ");
    Serial.println(payload);
  } else {
    Serial.print("Error during request, error code: ");
    Serial.println(httpResponseCode);
  }
  http.end(); // Terminate the HTTP connection
  return payload;
}

void heizung_ein() { // Function for switching on the heating
  Serial.println("Switch on the heating...");
  String payload = http_Post_Request(schalter_on);
// Extract only the true or false with indexOf
  int pos = payload.indexOf(':'); // Search for the first ':', e.g. {"ison":true,
  int pos2 = payload.indexOf(',');

  String result = payload.substring(pos + 1, pos2);
  Serial.print("Answer from Shelly: ");
  Serial.println(result);

  if (result == "true") {
    Serial.println("Heating successfully switched on!");
    Serial.println();
  } else {
    Serial.println("Error when switching on the heating.");
    Serial.println();
  }
}

void heizung_aus() { // Function for switching off the heating
  Serial.println("Switch off the heating...");
  String payload = http_Post_Request(schalter_off);

  int pos = payload.indexOf(':');
  int pos2 = payload.indexOf(',');

  String result = payload.substring(pos + 1, pos2);
  Serial.print("Answer from Shelly: ");
  Serial.println(result);

  if (result == "false") {
    Serial.println("Heating successfully switched off!");
    Serial.println();
  } else {
    Serial.println("Error when switching off the heating.");
    Serial.println();
  }
}
The output of the serial interface
Establishing a connection to the WLAN…
E (550) wifi:Set status to INIT
……..
Connected withConnected withIP: 192.168.33.3
Switch on the heating…
Answer: {“ison”:true,”has_timer”:true,”timer_started”:0,”timer_duration”:3600,”timer_remaining”:3600,”source”:”http”}
Answer vom Shelly: true
Heating successfully switched on!
Switch off the heating…
Answer: {“ison”:false,”has_timer”:false,”timer_started”:0,”timer_duration”:0,”timer_remaining”:0,”source”:”http”}
Answer from Shelly: false
Heating successfully switched off!
It is important to me that I get clean feedback from the Shelly so that remote shifting is possible.
In this DIYTechAdventure, I’ve shown you how to trigger switching operations on the Shelly using an ESP32. There are many applications for this—such as controlling a heater based on temperature readings from a sensor connected to the ESP, switching lights on and off, and more.
In the next DIYTechAdventure, I’ll show how to control the Shelly using a smartphone.
Leave a comment to let me know how you liked this adventure! Feel free to ask any questions you have.
