Rotary Encoder KY-040: A comprehensive guide for your next project
The KY-040 Rotary Encoder is a versatile tool used in numerous electronics projects. Its ability to capture precise rotary motion makes it ideal for applications in robotics, automotive and home automation projects.
Structure and Functionality
The KY-040 consists of a rotary knob attached to a sensor. This sensor detects rotational movements and converts them into electrical signals. With these signals, microcontrollers like Arduino or Raspberry Pi can determine the position and direction of the rotation.
Technical Specifications
- Voltage range: 3.3V to 5V
- Resolution: 20 steps per revolution
- Connection: 5 pins (GND, VCC, SW, DT, CLK)
- Operating temperature: -40°C to +85°C
Application Areas
The Rotary Encoder KY-040 is used in many projects. Here are some examples:
- Robotics: Controlling robot arms or chassis.
- Automotive engineering: Adjusting audio systems or climate control systems.
- Home automation: Controlling lighting systems or thermostats.
Integration into Arduino Projects
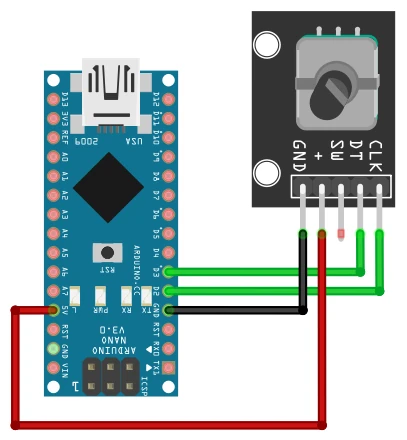
Wiring the Rotary Encoder is relatively simple. CLK and DT are the output pins and go to the interrupt pins D2/D3. Then, connect VCC (5V) and GND. SW is the switch, allowing us to additionally query the button press.


To connect the KY-040 to an Arduino, you only need some basic programming knowledge. Here is a simple code snippet to get started:
#define CLK 2
#define DT 3
int counter = 0;
int currentStateCLK;
int lastStateCLK;
void setup() {
  pinMode(CLK, INPUT);
  pinMode(DT, INPUT);
  lastStateCLK = digitalRead(CLK);
  Serial.begin(9600);
}
void loop() {
  currentStateCLK = digitalRead(CLK);
  if (currentStateCLK != lastStateCLK) {
    if (digitalRead(DT) != currentStateCLK) {
      counter++;
    } else {
      counter--;
    }
    Serial.println(counter);
  }
  lastStateCLK = currentStateCLK;
}
Advantages of the KY-040
- Precision: High accuracy in detecting rotational movements.
- Simplicity: Easy integration into existing systems.
- Versatility: Use in numerous application areas
For my project “Maturing Cabinet for salami and ham,” I have chosen a more extensive version of the rotary encoder query. This version was presented by Nikolaus Lüneburg and was originally found in the Arduino Playground.
The key features here are the use of external interrupts that interrupt a currently running task on the computer and seamlessly capture the rotary pulses. At the same time, this sketch handles the debouncing of the pulses, preventing multiple steps from being accidentally registered for a single pulse, either increasing or decreasing the values. You can read about what you can do with attachInterrupt() on the Arduino website.
#define encoderPinA 2
#define encoderPinB 3

volatile unsigned int encoderPos = 0;  // a counter for the dial
unsigned int lastReportedPos = 1;   // change management
static boolean rotating=false;      // debounce management

// interrupt service routine vars
boolean A_set = false;
boolean B_set = false;


void setup() {

  pinMode(encoderPinA, INPUT);
  pinMode(encoderPinB, INPUT);

  digitalWrite(encoderPinA, HIGH);  // turn on pullup resistors
  digitalWrite(encoderPinB, HIGH);  // turn on pullup resistors

  attachInterrupt(0, doEncoderA, CHANGE); // encoder pin on interrupt 0 (pin 2)
  attachInterrupt(1, doEncoderB, CHANGE); // encoder pin on interrupt 1 (pin 3)

  Serial.begin(9600);  // output
}

void loop()
{
  rotating = true;  // reset the debouncer

  if (lastReportedPos != encoderPos)
  {
    Serial.print("Index:");
    Serial.println(encoderPos, DEC);
    lastReportedPos = encoderPos;
  }
}

// Interrupt on A changing state
void doEncoderA()
{
  if ( rotating ) delay (1);  // wait a little until the bouncing is done
  if( digitalRead(encoderPinA) != A_set ) {  // debounce once more
    A_set = !A_set;
    // adjust counter + if A leads B
    if ( A_set && !B_set )
      encoderPos += 1;
    rotating = false;  // no more debouncing until loop() hits again
  }
}

// Interrupt on B changing state, same as A above
void doEncoderB(){
  if ( rotating ) delay (1);
  if( digitalRead(encoderPinB) != B_set ) {
    B_set = !B_set;
    //  adjust counter - 1 if B leads A
    if( B_set && !A_set )
      encoderPos -= 1;
    rotating = false;
  }
}
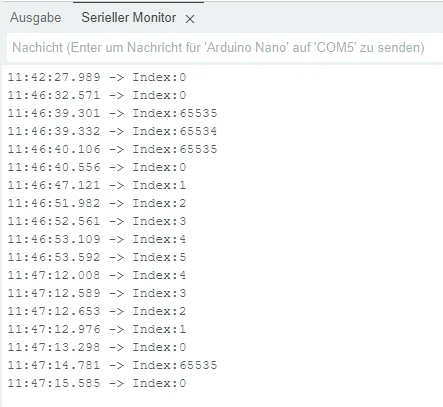
Here is the output on the serial interface.

Conclusion
The Rotary Encoder KY-040 is an indispensable tool for any electronics enthusiast. Its ease of use and versatility make it the ideal choice for numerous projects. Whether you are a beginner or an experienced developer, the KY-040 will enhance your projects and open up new possibilities for you.
