The SHT31 is a high-precision sensor developed by Sensirion for measuring temperature and humidity. This sensor is characterized by its high accuracy, reliability and durability, which makes it an excellent choice for various applications in industry, science and everyday life.
Important features of the SHT31:
Short introduction to the I2C bus
The I2C bus (Inter-Integrated Circuit) is a serial communication bus developed by Philips (now NXP). It enables communication between various integrated circuits (ICs) and microcontrollers in a simple and efficient way. The I2C bus uses only two lines: a data line (SDA) and a clock line (SCL).
Features of the I2C bus
- Two-wire interface: The I2C bus only requires two lines to transfer data between devices, which simplifies cabling.
- Multi-master and multi-slave support: Several master and several slave devices can be connected to the same bus. This enables flexible and complex communication networks.
- Addressing: Each device on the I2C bus has a unique address, allowing the master to communicate with a specific slave.
- Clock-controlled: Communication is synchronous, with the master controlling the clock line and thus regulating the data flow.
- Easy implementation: The I2C bus is widely used and well documented, which facilitates integration into various projects and applications.
Due to its versatility and simplicity, the I2C bus is widely used in many electronic devices and applications, such as sensors, memory modules and microcontrollers.
Setting up a measuring circuit with the ESP32
Parts required:


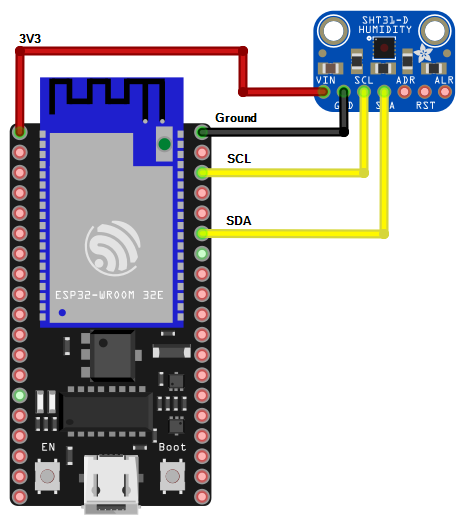
The structure of the circuit is quite simple.
As mentioned in the brief description of the I2C bus, we need 2 data lines SCL (GPIO 21) and SDA (GPIO 22). In addition, the power supply via ground and 3.3 volts.
The data sheet specifies a supply voltage between 2.4 – 5.5 volts.
Programming with VS Studio Code
Requirement: Installed VS Studio code
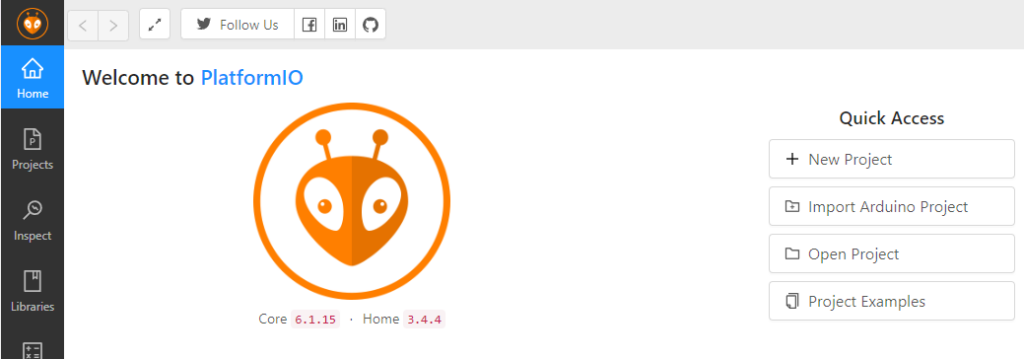
First of all, we need to create a new project. Please click on the PlatformIO icon.
Then click on “Create New Project”.

Of course, we can also create a new project directly on the PlatformIO home screen.

In the project wizard, we make the desired settings, such as the project name and also specify the board used. The framework is the Arduino framework and under Location you can specify whether you want to use the standard memory path or your own. Click on “Finish” to create the new project.

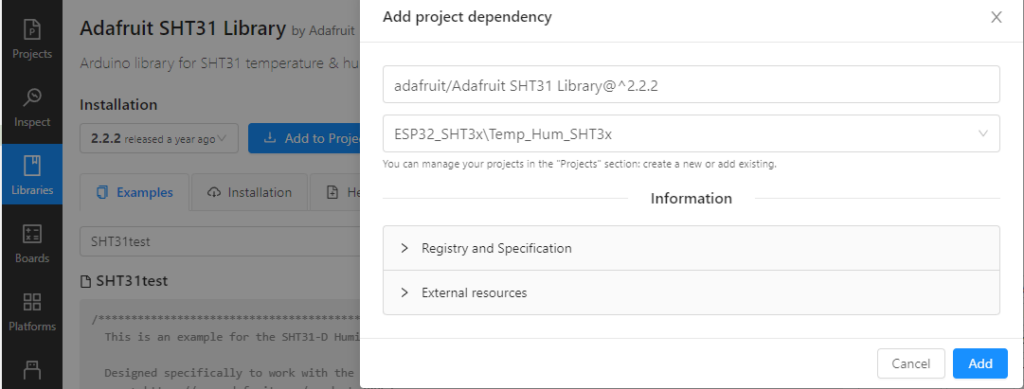
Then we need to include the library for the SHT31. In the same window under Libraries you can search for the SHT31 and you should find the Adafruit SHT31 Library. Please click on this link.

Here you will find sample code for the use of this library and further information.
Please click on “Add to Project”. You can see the process on the screen. Click on “Add” to add the library to the project.

A look at the Platform.ini also shows you the success. The library is integrated.
[env:esp32dev]
platform = espressif32
board = esp32dev
framework = arduino
lib_deps = adafruit/Adafruit SHT31 Library@^2.2.2
The preparations are now complete and we can turn our attention to the code.
#include <Arduino.h>
#include <Wire.h>
#include <SPI.h>
#include <Adafruit_SHT31.h>

// Erstellen eines Objekts für den SHT31 Sensor
Adafruit_SHT31 sht31 = Adafruit_SHT31();

void setup() {
  // Initialization of serial communication for debugging
  Serial.begin(115200);

  // Initialization of the I2C bus
  Wire.begin();

  // Initialisierung des SHT31 Sensors
  if (!sht31.begin(0x44)) {  // 0x44 is the I2C address of the SHT31
    Serial.println("Could not find SHT31, check the wiring!");
    while (1) delay(1);
  }

  Serial.println("SHT31 Sensor found!");
}

void loop() {
  // Reading the temperature
  float temperature = sht31.readTemperature();
  // Reading the humidity
  float humidity = sht31.readHumidity();

  // Check that the measured values are valid
  if (!isnan(temperature)) {  // isnan checks whether the value is 'NaN' (Not a Number)
    Serial.print("Temperature: ");
    Serial.print(temperature);
    Serial.println(" °C");
  } else {
    Serial.println("Error when reading the temperature!");
  }

  if (!isnan(humidity)) {
    Serial.print("Humidity: ");
    Serial.print(humidity);
    Serial.println(" %");
  } else {
    Serial.println("Error when reading the humidity!");
  }

  // Waiting time of 10 seconds before the next measurement
  delay(10000);
}
Explanation of the code
- Integrate libraries: The Wire.h and SPI.h libraries are required for I2C communication, and the Adafruit_SHT31.h library for the SHT31 sensor.
- Create sensor object: An Adafruit_SHT31 object is created to control the sensor.
- Setup function:
- Initialization of the serial interface for debugging purposes.
- Initializing the I2C bus.
- Initialize the SHT31 sensor and check whether the sensor has been found.
- Loop function:
- Read out the temperature and humidity values from the sensor.
- Check the validity of the measured values and output to the serial console.
- A delay of 10 seconds before the next measurement.
Check and upload script
Now that we have dealt with the code itself, it is time to upload and test it.
Just like in the Arduino IDE, the code can be checked syntactically using the checked symbol. The code is compiled and uploaded with the arrow pointing to the right. With the connector symbol you can switch to the output of the serial interface.

Processing esp32dev (platform: espressif32; board: esp32dev; framework: arduino)
Verbose mode can be enabled via -v, –verbose option
CONFIGURATION: https://docs.platformio.org/page/boards/espressif32/esp32dev.html
PLATFORM: Espressif 32 (6.7.0) > Espressif ESP32 Dev Module
HARDWARE: ESP32 240MHz, 320KB RAM, 4MB Flash
DEBUG: Current (cmsis-dap) External (cmsis-dap, esp-bridge, esp-prog, iot-bus-jtag, jlink, minimodule, olimex-arm-usb-ocd, olimex-arm-usb-ocd-h, olimex-arm-usb-tiny-h, olimex-jtag-tiny, tumpa)
PACKAGES:
framework-arduinoespressif32 @ 3.20016.0 (2.0.16)
tool-esptoolpy @ 1.40501.0 (4.5.1)
tool-mkfatfs @ 2.0.1
tool-mklittlefs @ 1.203.210628 (2.3)
tool-mkspiffs @ 2.230.0 (2.30)
toolchain-xtensa-esp32 @ 8.4.0+2021r2-patch5
LDF: Library Dependency Finder -> https://bit.ly/configure-pio-ldf
LDF Modes: Finder ~ chain, Compatibility ~ soft
Found 35 compatible libraries
Scanning dependencies…
Dependency Graph
|– Adafruit SHT31 Library @ 2.2.2
|– SPI @ 2.0.0
|– Wire @ 2.0.0
Building in release mode
Compiling .pio\build\esp32dev\src\main.cpp.o
Retrieving maximum program size .pio\build\esp32dev\firmware.elf
Checking size .pio\build\esp32dev\firmware.elf
Advanced Memory Usage is available via “PlatformIO Home > Project Inspect”
RAM: [= ] 6.7% (used 21808 bytes from 327680 bytes)
Flash: [== ] 22.0% (used 288645 bytes from 1310720 bytes)
Configuring upload protocol…
AVAILABLE: cmsis-dap, esp-bridge, esp-prog, espota, esptool, iot-bus-jtag, jlink, minimodule, olimex-arm-usb-ocd, olimex-arm-usb-ocd-h, olimex-arm-usb-tiny-h, olimex-jtag-tiny, tumpa
CURRENT: upload_protocol = esptool
Looking for upload port…
Using manually specified: COM3
Uploading .pio\build\esp32dev\firmware.bin
esptool.py v4.5.1
After compiling the code, the flash process starts immediately
The corresponding COM port is checked and the data from the ESP chip is read.
For other projects it is also important to know the MAC address. Some memory areas are deleted and partially rewritten. The progress of the upload is then also displayed as a percentage.
Serial port COM3
Connecting….
Chip is ESP32-D0WDQ6-V3 (revision v3.0)
Features: WiFi, BT, Dual Core, 240MHz, VRef calibration in efuse, Coding Scheme None
Crystal is 40MHz
MAC: 24:0a:c4:f8:f5:68
Uploading stub…
Running stub…
Stub running…
Changing baud rate to 460800
Changed.
Configuring flash size…
Flash will be erased from 0x00001000 to 0x00005fff…
Flash will be erased from 0x00008000 to 0x00008fff…
Flash will be erased from 0x0000e000 to 0x0000ffff…
Flash will be erased from 0x00010000 to 0x00056fff…
Compressed 17536 bytes to 12202…
Writing at 0x00001000… (100 %)
Wrote 17536 bytes (12202 compressed) at 0x00001000 in 0.6 seconds (effective 237.1 kbit/s)…
Hash of data verified.
Compressed 3072 bytes to 146…
Writing at 0x00008000… (100 %)
Wrote 3072 bytes (146 compressed) at 0x00008000 in 0.1 seconds (effective 310.8 kbit/s)…
Hash of data verified.
Compressed 8192 bytes to 47…
Writing at 0x0000e000… (100 %)
Wrote 8192 bytes (47 compressed) at 0x0000e000 in 0.1 seconds (effective 449.3 kbit/s)…
Hash of data verified.
Compressed 289008 bytes to 161243…
Writing at 0x00010000… (10 %)
Writing at 0x0001be08… (20 %)
Writing at 0x00024933… (30 %)
Writing at 0x00029fd8… (40 %)
Writing at 0x0002f664… (50 %)
Writing at 0x000348b6… (60 %)
Writing at 0x0003c00a… (70 %)
Writing at 0x0004529c… (80 %)
Writing at 0x0004c63e… (90 %)
Writing at 0x00051b77… (100 %)
Wrote 289008 bytes (161243 compressed) at 0x00010000 in 3.8 seconds (effective 612.3 kbit/s)…
Hash of data verified.
Output on the serial interface:
After the upload process was successful, you can switch to the output of the serial interface with the plug symbol and see the result of your script’s work.
SHT31 Sensor gefunden!
Temperatur: 26.87 °C
Luftfeuchtigkeit: 61.57 %
Temperatur: 26.85 °C
Luftfeuchtigkeit: 61.47 %
Temperatur: 26.81 °C
Luftfeuchtigkeit: 61.46 %
Temperatur: 26.78 °C
Luftfeuchtigkeit: 61.56 %
Temperatur: 26.74 °C
Luftfeuchtigkeit: 61.44 %
Temperatur: 26.74 °C
Luftfeuchtigkeit: 61.45 %
Temperatur: 26.71 °C
Luftfeuchtigkeit: 61.48 %
Temperatur: 26.70 °C
Luftfeuchtigkeit: 61.49 %
Temperatur: 26.67 °C
Luftfeuchtigkeit: 61.60 %
This DIYTechAdventure should give you a good starting point to use the SHT31 sensor with an ESP32 in the Arduino framework. Good luck with your project!
